Coding Workshop 4 - How Much App Part 3

What we want to do now, is when users tap on the Calculate button, present a view that will come up part way from the bottom of the screen and display the totals, tip and individual portion owed.
For this, we will need to create a new SwiftUI View.
Create a new View
Create a new SwiftUI file and call it TotalsView.
This view will receive 3 things from our main
ContentView; atotalas a Double, thetipPctas an Int andnumPeoplewhich is another Int, These values will not be changing so we can use a let (constant ).
xxxxxxxxxxstruct TotalsView: View { let total: Double let tipPct: Int let numPeople: Int var body: some View { Text("Hello, World!") }}
The
PreviewProviderwill complain because it needs some sample values when it creates the view for preview on the canvas.
If you place your cursor in between the () on TotalsView() then hold down the
Note: the way we are presenting our view here in the canvas is the same way that we will present it from our ContentView. The only difference will be that the 3 values will be our state variables from our ContentView
xxxxxxxxxxstruct TotalsView_Previews: PreviewProvider { static var previews: some View { TotalsView(total: 135.20, tipPct: 18, numPeople: 3) }}We can now design our view because we have some sample data.
First though, let's create computed properties to generate the tip, total amounts and individual portions. To calculate a tip we multiply the total buy the tip percentage and divide by 100 Unfortunately, you cannot multiply an
Doublevalue by anIntegervalue.
xxxxxxxxxxtotal * tipPct / 100 // Does not work because we cannot multiply a Double by an IntTo fix this we can surround the integer value with Double() and this will convert it to a Double.
xxxxxxxxxxvar tipAmount: Double { total * Double(tipPct) / 100}We can create two more computed properties to represent the total amount and the individual portion, making sure that we are always working with values of the same type.
xxxxxxxxxxvar totalAmount: Double {    total + tipAmount}
var portion: Double {    totalAmount / Double(numPeople)}
Now we have everything we need.
Grid
We are going to lay out our presentation using a Grid which was introduced in iOS 16
See full video on this topic
Start with a
Gridcontainer Replace the Text view with aGridview.
xxxxxxxxxxGrid { }Inside there we will create 4 rows, each with 2 columns so we use a
GridRowas a container and provide the two columns as text views for each of the columns (Don't worry about formatting yet)For the first Text view, use the string "Original Bill"
For the second, we want to display the total but this is not a
String, so we need to useStringInterpolationto display the number.
xxxxxxxxxxGridRow { Text("Original Bill") Text("\(total)")}Repeat for the remaining three rows, changing the static string to represent the original bill, the tip, the total and the portion Use string interpolation to display the total and calculated values.
xxxxxxxxxxGrid { GridRow { Text("Original Bill") Text("\(total)") } GridRow { Text("Tip") Text("\(tipAmount)") } GridRow { Text("Total") Text("\(totalAmount)") } GridRow { Text("Portion") Text("\(portion)") }}GridColumnAlignment
We can set the alignment of the first column by setting that on the first view in any of the grid rows
Similarly we can do the same for the second column.
For the first column, we can set the
.gridColumnAlignmentto.leading.For the second column, we can set the
.gridColumnAlignmentto.trailing.
This will align all of the first column titles to the leading edge and the money to the trailing edge.
xxxxxxxxxxGridRow { Text("Original Bill") .gridColumnAlignment(.leading) Text("\(total)") .gridColumnAlignment(.trailing)}Formatting the Currency
There are a couple of different ways to format our money as currency. In iOS 15 a new format was introduce for strings
xxxxxxxxxx Text("\(total, format: .currency(code: "CAD"))")I don't like that because it adds "CA" in front of the money value ( "CA $125.56").
This is a Canadian thing though and if you used USD, that would not appear and as you will see, my simulator is defaulting to USD.
If your app is being sold in other countries though, you want the currency to be diplayed using their local. So what you can do is create another constant outside of the body and call it identifier.
You can set this identifier to be the Locale.current currency.identifier and this will try to recognize the identifier for the locale set on the iPhone. This is optional so we can use nil coalescing to just assign an empty string to unwrap the value.
xxxxxxxxxxlet identifier = Locale.current.currency?.identifier ?? ""Now we can assign that identifier in place of our fixed string and you see it now has the CA removed as my install is set for the US
And then we can copy and paste this format for the remaining strings.
Grid modifiers
We can increase the size of the text by applying a
.font(.title)modifier to the entire grid.
xxxxxxxxxx.font(.title)We can increase the spacing between columns by adding a
.horizontalSpacingargument to the Grid when it is created.
xxxxxxxxxxGrid(horizontalSpacing: 20) {We want this to be at the top of the view so we can embed in a
VStackand add aSpacer()
xxxxxxxxxxVStack { Grid(horizontalSpacing: 20) { GridRow { Text("Original Bill") .gridColumnAlignment(.leading) Text("\(total, format: .currency(code: identifier))") .gridColumnAlignment(.trailing) } GridRow { Text("Tip") Text("\(tipAmount, format: .currency(code: identifier))") } GridRow { Text("Total") Text("\(totalAmount, format: .currency(code: identifier))") } GridRow { Text("Portion") Text("\(portion, format: .currency(code: identifier))") } } .font(.title) Spacer()}
NavigationStack
Like the first view, we can add a title if we embed the
VStackin aNavigationStack.Add a
.navigationTitlemodifier to the VStack using the string "Amount Owing"Then we can specify that we want a small navigation bar by using the
.navigationBarTitleDisplayModemodifier and using.inline.
xxxxxxxxxxNavigationStack { VStack { } .navigationTitle("Amount Owing") .navigationBarTitleDisplayMode(.inline)}ContentView
Modal Sheet
Now it is time to return back to ContentView to present the modal sheet.
The .sheet modifier can be attached to any view in the view hierarchy, but I like to associate it with the view that provides the action that will present it.
There are two different overloads to create a modal sheet. The simplest is one which is presented when a boolean property to which it is bound is set to true.
Calculate Button
We already have that calculate button that does that for us. It sets the boolean calculate button to true
To this button, add a
.sheetmodifier whereisPresentedis bound to thecalculateproperty which means we need to use a$. What this does is pass on the calculate value (true) on to the new presented sheet and when the view gets dismissed, it automatically reverses the value and sets it back tofalse. This is called a binding andbindingto variables must be preceded by a$.
xxxxxxxxxx.sheet(isPresented: $calculate) { }Within the body of the sheet, we create our
TotalsView, passing on our 3@Stateproperties, but they will not be changing so they arenotboundand thus no$.totalhowever is aStringproperty so we will need to convert it to aDouble.
Converting aStringto aDoublewill always produce anOptionalvalue as a result so in that case, we use thenil coalescingonce more to provide the number 0 as an alternative. If the conversion to Double works, it will use that converted value, otherwise it will use 0.
xxxxxxxxxxTotalsView(total: Double(total) ?? 0, tipPct: tipPct, numPeople: numPeople)Presentation Detent
I want this to only appear part way up the screen, so apply a presentationDetent modifier to the view and specify we only want to allow a medium one.
The .presentationDetent modifier requires that we pass in an set of options. Since we only want to use a .medium one, our set contains only a single element.
xxxxxxxxxx.presentationDetents([.medium])Watch my video on this topic See https://youtu.be/8JmGGcsUdFM
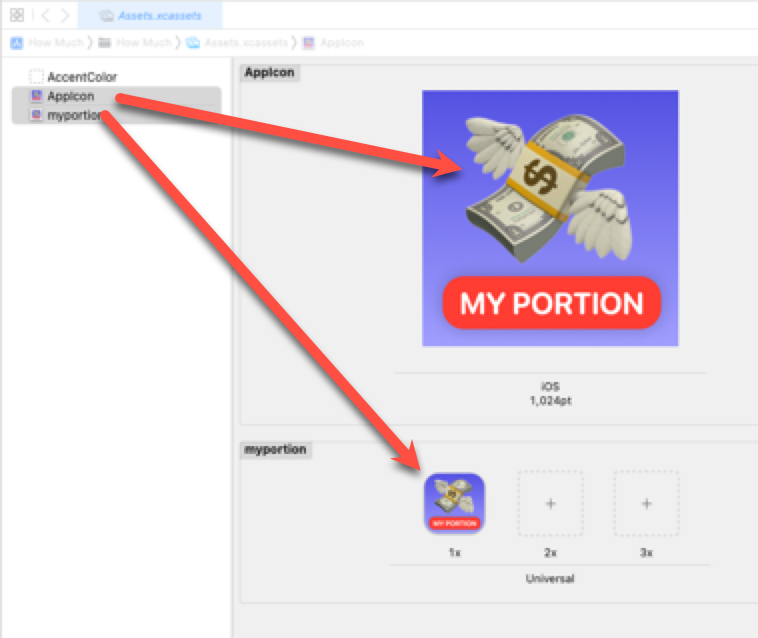
Adding Image Assets
Right now, our app has no icon, and our totals view does not have the image we saw in the preview image.
A folder of two assets were provided in the resources for this application.
appstore1024.png
One is an image that is 1024 X 1024 and I want to use it as the App Icon.
Open the assets folder in Xcode.
Select the
AppIconitem and drag and drop the image on to theplaceholderin the center.
myportion.png
This is a a smaller version with rounded corners and is 256 X 256.
Drag it on to the left below the AppIcon and it creates a new item for you and it uses the name of the file as the asset name.
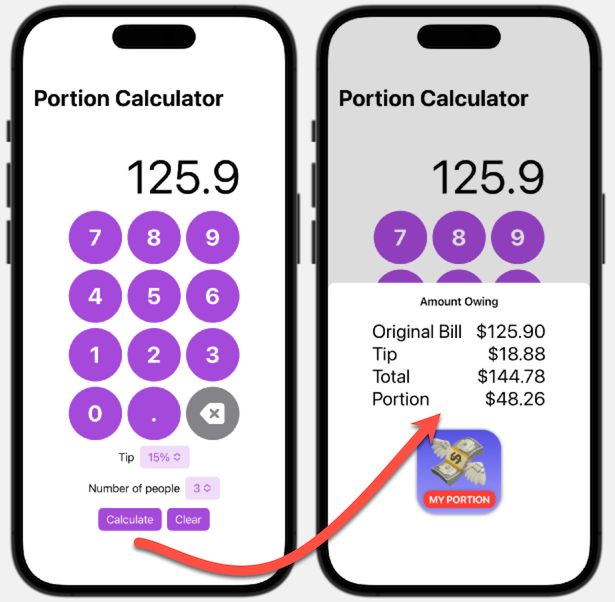
Using the myPortion image in the totalsView
In the totalsView, add, above the Spacer in the VStack, add an
Imageview and for the string, use the asset namemyportion.
xxxxxxxxxxImage("myportion")This creates it full size but we want to reduce it.
We can specify a frame with a width of 150.
xxxxxxxxxx.frame(width: 150)Nothing changes, because we have to precede the frame with a modifier that tells our image that it can be resized.
xxxxxxxxxx.resizable()This is not good because we only specified the width and the hight has grown to take the entire remaining space available.
We can specify a hight in the frame.
xxxxxxxxxx.frame(width: 150, height: 158)but that is because we know that our image is square, If it is some other proportion it would look strange.
We solve this by leaving it as just width and applying another modifier
scaledToFit()
xxxxxxxxxxImage("myportion") .resizable() .scaledToFit() .frame(width: 150)That's it
Bonus
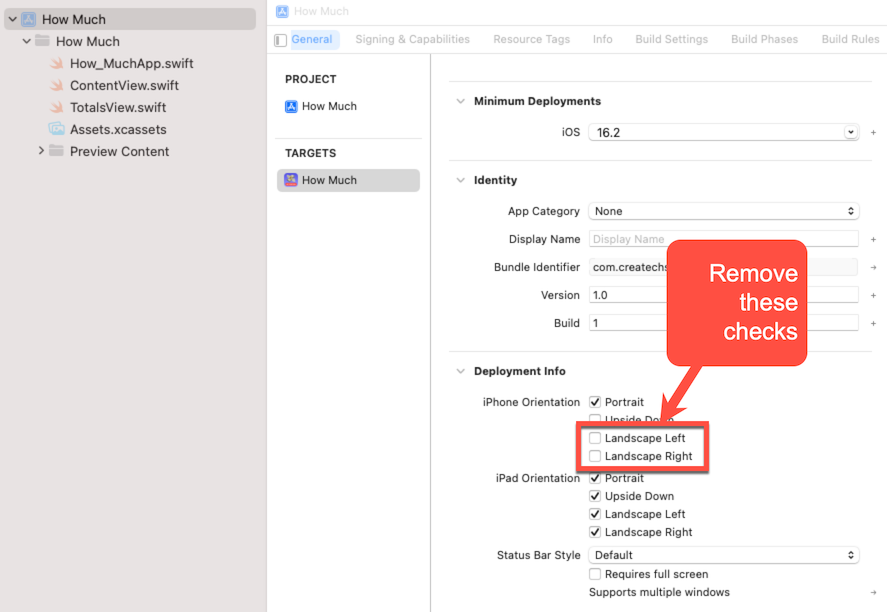
Prevent the device from being rotated into landscape mode on the iPhone.
The application is currently only useful when your locale uses a "." as a decimal separator. It will not work for countries that use a ",".
You can determine what that separator is from the static Locale proprty
xxxxxxxxxxLocale.current.decimalSeparatorThis is optional however and it is a String. To convert this to a Character, create a new constant called
xxxxxxxxxxlet decChar = Character(Locale.current.decimalSeparator ?? ".")Then you can replace instances where you use "." with this new constant. However, there are some cases, where you require the string value so you can convert the character to a String using
String(decChar).Use an AppStorage propertyWrapper to save your tip selection so that the next time the app launches, it will already be set
xxxxxxxxxx@AppStorage("tipPct") var tipPct = 0Use
ViewThatFitsto place your entire ContentView's VStack inside a ScrollView if necessaryHint: Cut out out the VStack and refactor it into a Computed property of
some Viewcalled contentViewxxxxxxxxxxvar contentView: some View {VStack {.....}}Where you cut out the VStack use a
ViewThatFitsand offer either just the contentView, or embed it in a ScrollViewxxxxxxxxxxvar body: some View {NavigationStack {ViewThatFits {contentViewScrollView {contentView}}.navigationTitle("Portion Calculator")}}