Coding Workshop 5 - Bucket List App Part 1

A Bucket List application where you can keep track of all of the things you want to do and places you want to go before you die.
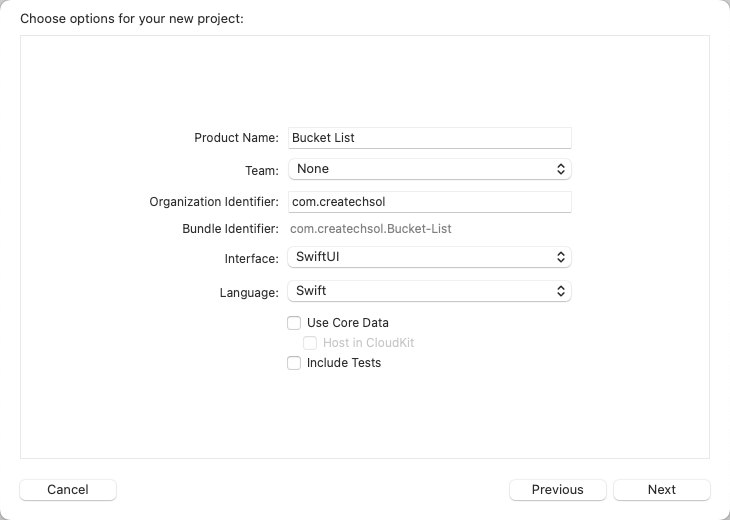
Create a new iOS App
Begin by creating a new iOS App in Xcode and name it Bucket List.
ContentView
Rename ContentView
As ContentView is going to be displaying our list of items on our bucket list, it is not a very clear description of the view's purpose so it is good practice to rename your views to reflect the content that it will display.
Rename the view by selecting the ContentView text and right-click and choose Refactor -> Rename... and give it the name BucketListView
Change the preview provider as well so that it is named BucketListView_Previews
Sample List
To get started, create a constant called
bucketListand initialize it with an array of Strings representing 3 or 4 examples of items that might be on your bucket listlet bucketList = ["Climb Everest", "Visit Hawaii", "Get Married"]Replace the
VStackand padding with aListview that iterates over the bucketList and use the\.selfkeyPath for theid.This will provide you with an iterator you can call
itemand we will use itinthe body of the closure where we can create aTextview that will display that item.Set the
listStyleof the list to.plain.Embed the list in a
NavigationStack.Add a
.navigationTitleto the List and the style and assign the string "Bucket List".
struct BucketListView: View { let bucketList = ["Climb Everest", "Visit Hawaii", "Get Married"] var body: some View { NavigationStack{ List(bucketList, id: \.self) { item in Text(item) } .listStyle(.plain) .navigationTitle("Bucket List") } }}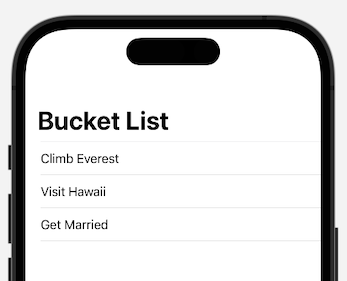
Change to State property so we can add new items
If we want to be able to add, update, delete or edit one of the items in the bucketList, it will need to be changed to an
@Stateproperty and make it private (this is best practice).Create another private
@Stateproperty callednewItemand initialize it as an empty string.Embed everything in the
NavigationStackexcept thenavigationTitlein aVStack.As the first item in the
VStack, create anHStack.Inside the
HStack, create aTextField..For the title, use the string "New Bucket Item" and for the text, bind it to
$newItem.Apply the .
roundedBorder.textFieldStyle.Create a button and use the overload that will allow us to specify a view instead of just a string for the label.
Button {} label: {}For the label, use
Image(systemName: "plus.circle.fill")For the action.
AppendthenewItemto thebucketList.Set
newItemback to an empty String ("").
Set the
.disabledmodifier on the button to be true with thenewItemis empty.
Apply
paddingto theHStack.
struct BucketListView: View { @State private var bucketList = ["Climb Everest", "Visit Hawaii", "Get Married"] @State private var newItem = "" var body: some View { NavigationStack{ VStack { HStack { TextField("New Bucket item", text: $newItem) .textFieldStyle(.roundedBorder) Button { bucketList.append(newItem) newItem = "" } label: { Image(systemName: "plus.circle.fill") } .disabled(newItem.isEmpty) } .padding() List(bucketList, id: \.self) { item in Text(item) } .listStyle(.plain) } .navigationTitle("Bucket List") } }}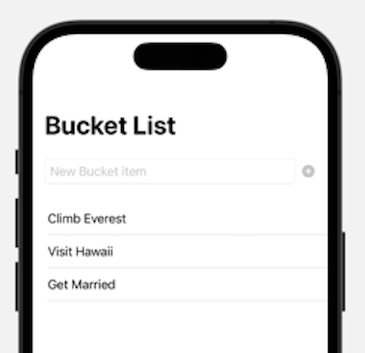
Refactor the List to use ForEach so we can delete
If we refactor the List view to use a ForEach loop, it provides us with the built in ability to easily add swipe deletion.
Remove the
(bucketList, id: \.self) { item infrom the List constructor and leave it simply asList {Embed the
Textview within aForEachloop that uses the same constructor that we had for the List previously.List {ForEach(bucketList, id: \.self) { item inText(item)}}Apply an
.onDeletemethod on the ForEach loop that will remove at the offsets of the selectedindexSet.
List { ForEach(bucketList, id: \.self) { item in Text(item) } .onDelete { indexSet in bucketList.remove(atOffsets: indexSet) }}Add Navigation
When we tap on an item in the list, we want to be taken to a different view that will display the item alone on that view. We will improve on this in the next section.
Change the
Text(item)to aNavigationLink.This requires a
Hashablevalue and since strings are Hashable, we can use our item as that value for the label.The label requires a view, so we can create a TextView with our item.
Below the
.navigationTitle, but still within theNavigationStack, add a.navigationDestinationmethod.A navigation destination requires that we identify the
Typeof object that will initiate the move to the destination. In our case, that is aStringso we enterString.selfThe destination will be provided with the actual value that triggered the navigation and we know that will be the item that we tapped on, so we can specify that with a variable called
itemthat we will useinthe creation of our ViewFor now, the view that will be presented will just be a
Textview using thatitem.Apply a
.fontsize of.title
List { ForEach(bucketList, id: \.self) { item in NavigationLink(value: item) { Text(item) } } .onDelete { indexSet in bucketList.remove(atOffsets: indexSet) }}.listStyle(.plain).navigationTitle("Bucket List").navigationDestination(for: String.self) { item in Text(item) .font(.title)}For more information and tutorials on NavigationStack see these videos:
Introduction to NavigationStack in iOS 16 https://youtu.be/6-OeaFfDXXw
iOS 16 Navigation Stack Part 2 - Back to Root and Deep Links https://youtu.be/pwP3_OX2G9A
Enum Navigation in iOS 16 https://youtu.be/RPhBPhHw2gA
Part 1 Completed Code
struct BucketListView: View {    @State private var bucketList = ["Climb Everest", "Visit Hawaii", "Get Married"]    @State private var newItem = ""    var body: some View {        NavigationStack{            VStack {                HStack {                    TextField("New Bucket item", text: $newItem)                        .textFieldStyle(.roundedBorder)                    Button {                        bucketList.append(newItem)                        newItem = ""                    } label: {                        Image(systemName: "plus.circle.fill")                    }                    .disabled(newItem.isEmpty)                }                .padding()                List {                    ForEach(bucketList, id: \.self) { item in                        NavigationLink(value: item) {                            Text(item)                         }                    }                    .onDelete { indexSet in                        bucketList.remove(atOffsets: indexSet)                    }                }                .listStyle(.plain)            }            .navigationTitle("Bucket List")            .navigationDestination(for: String.self) { item in                Text(item)                    .font(.title)            }        }    }}
struct BucketListView_Previews: PreviewProvider {    static var previews: some View {        BucketListView()    }}