Coding Workshop 6 - Bucket List App Part 2

So far so good, but we want to be able to provide more information about our bucket list items and be able to assign a date when completed.
New BucketItem model file
Create a new Swift file (not SwiftUI) and call it BucketItem.
Inside there, create a new
structwith the same name.All Structs and Classes should be Uppercased - CamelCased. (SomeStruct), properties and variables should be lowercased CamelCased (someProperty),
If we want to be able to use this in a
ForEachloop, we nee to be able to identify unique items in our list but how do we identify something that has more than one property. We can solve this by conforming the BucketItem struct to theIdentifiableprotocol.This will require the creation of an
idproperty that will be unique.We can use a special object called a
UUID()that generates a random, unique string.
Create a property for
nameand assign it the typeStringbut provide no initial value.Create a property called
noteand assign it the initial value of an empty string. Swift will infer then that name'sTypeis aString.Create a property called
completedDateand though things are initially not completed, when working with dates, I prefer to assign dates that are not completed using a specific date that is astaticDateproperty calleddistantPastthis is a unique date so far in the past, there is virtually no chance that anyone would ever pick it from a date picker. So whenever we need to check to see if a completed date has been set, we can compare it toDate.distantPast.
xxxxxxxxxxstruct BucketItem: Identifiable { var id = UUID() var name: String var note = "" var completedDate = Date.distantPast}Static Array for Sample Items
For design and testing purposes as you build your app, it is useful to create an array of sample items as we did for our simple array of String.
We can do this by creating a
staticproperty calledsamplesin ourBucketItemstruct that will return and array ofBucketItem.For the return, you can begin by creating an array
[].Create a new instance of
BucketItemand sinceid,noteandcompletedDateall have initial values, we only need to provide a name.If we want, however, we can add additional values to override the default ones.
Create one with a
note.Create one with a
noteand acompletedDateand use today's date as the date -Date().
xxxxxxxxxxstatic var samples: [BucketItem] { [ BucketItem(name: "Climb Mt Everest"), BucketItem(name: "Visit Hawaii", note: "Go to Maui and Oahu"), BucketItem(name: "Get Married", note: "Found the love of my life", completedDate: Date()) ]}Update BucketListView
Now that we have our new model and sample items, we can update our BucketListView to use this new model and array of sample data for your project.
State property
Instead of our bucketList being an array of String, we change it to an array of BucketItem and initialize it with our array of samples using our static property.
xxxxxxxxxx@State private var bucketList:[BucketItem] = BucketItem.samplesButton Action
A number of errors occur because we are no longer working with a simple String, but first we should fix our button action.
We will no longer be appending just a
newItemstring to our bucketList. We will need a newBucketIteminitialized withnewItemas the name property..Then the bucketList can append the newBucketItem.
xxxxxxxxxxButton { let newBucketItem = BucketItem(name: newItem) bucketList.append(newBucketItem) newItem = ""} label: { Image(systemName: "plus.circle.fill")}List -> ForEach
Our ForEach loop within the List now must iterate over the new array of BucketItem
We no longer need to provide the
idbecause we have specified that theBucketItemconforms to theIdentifiableprotocol and it has anidproperty.The value for the
navigationLinkwill continue to be theitembut theTextview will display only theitem.name.There is one other error that is displayed and this lets us know that
BucketItemmust also conform to theHashableprotocol.In computer science, "hashable" means that an object can be converted into a unique, fixed-size value (called a "hash") using a hash function. This hash can then be used to quickly look up the original object in a collection, such as a dictionary or set. In simple terms, it means that an object can be turned into a unique code so it can be easily found and identified later. In swift, String, Int, Date, Double etc are all Hashable.
Return to the
BucketItemstruct and since all thee properties areHashabletypes, all we need to do is to add the Hashable protocol in our declaration.xxxxxxxxxxstruct BucketItem: Identifiable, Hashable {
xxxxxxxxxxForEach(bucketList) { item in NavigationLink(value: item) { Text(item.name) }}Update .navigationDestination
Our
.navigationDestinationTypeis no longer aString.self, so we need to change it toBucketItem.self.The Text view that we will be presenting then also needs to present the
nameproperty of theitem.
xxxxxxxxxx.navigationDestination(for: BucketItem.self) { item in Text(item.name) .font(.title)}Change ForEach's Text view to TextField
We way to be able to update my bucketList item names inline, in the list so we can't use a Text view, we need to use a TextField and this asks us for the title which can be a String, and the text argument must be a Binding<String> which means that it is going to update whatever it is bound to. The problem right now is that our item is not a Binding<String>, it is just a String. We can fix this in a list.
Change the
ForEacharray to a binding of bucketList$ this will allow us to iterate over the item as a binding: $item.Now we can create our
TextFielddisplaying our label string asitem.nameand the text is bound to$item.To make the entry more distinguishable and to separate it from the navigation chevron
>we can apply a.textFieldStyleof.roundedBorder.We can also increase the size of the text in a TextField to a
.font(.title3).Then we no longer need to see the separator lines between rows so we apply a
listRowSeparatormodifier of.hiddento theNavigationLink.
xxxxxxxxxxForEach($bucketList) { $item in NavigationLink(value: item) { TextField(item.name, text: $item.name) .textFieldStyle(.roundedBorder) .font(.title3) } .listRowSeparator(.hidden)}Add Wordwrap
Testing now, you see we can update our items directly in the list, however, if we type too much into our TextField, it just keeps moving to the right, and then if the field loses focus, the text will truncate to show ... at the end.
We can improve the display of our TextField by adding an axis argument of .vertical and this will allow the TextField to grow vertically.
xxxxxxxxxxTextField(item.name, text: $item.name, axis: .vertical)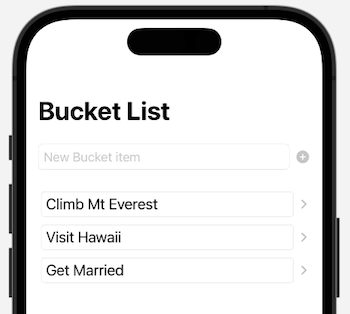
DetailView
Simply displaying our name when we navigate is really not ideal. What I want to do is to navigate to a new view where I am able to update the other two properties; the note and the completedDate. Remember, we modify the name property within the list so I can use that property when I get to the new view as the navigation bar title.
Create a new SwiftUI view called DetailView
When this view appears, it will be receiving the
bucketItemthat was tapped on. Unfortunately, this is a "copy" of the actual item and not a reference to the original so we will need to figure out how we can determine which one that is and then update the original, but for now, let's pass it in as a constant calledbucketItemthat is aBucketItemtype.Since this view will be pushed on top of the list view by a
NavigationLinkthis view will inherit theNavigationStackso we can add a.navigationTitleto theTextview that we have. So we can specify that it is the bucketItem.name property.xxxxxxxxxxstruct DetailView: View {let bucketItem: BucketItemvar body: some View {Text("Hello, World!").navigationTitle(bucketItem.name)}}
PreviewProvider Parameters
The preview provider is complaining because it does not have a bucketItem parameter.
For previews to display content that requires a parameter, we can create
staticproperty that will represent a bucketItem and se can use one of the 3 items in our BucketItem.samples array likeBucketItem.samples[2]Then we can provide that for our
DetailView
Fix the previewProvider by providing a sample bucketItem
xxxxxxxxxxstruct DetailView_Previews: PreviewProvider { static let bucketItem = BucketItem.samples[2] static var previews: some View { DetailView(bucketItem: bucketItem) }}Missing NavigationTitle
You may also notice that the preview canvas is not showing our title. This is because the preview has no idea that it is coming from a NavigationLink.
We can fix this by specifically enclosing the
DetailViewin the preview in aNavigationStackxxxxxxxxxxNavigationStack {DetailView(bucketItem: bucketItem)}With this done, you should be able to choose a different array index for you static bucketItem and see the title change.
New @State Properties
As mentioned above, the passed in (injected) bucketItem is a copy of the original item so updating it will not update the original.
In addition, this is not a @State or @Binding to the item in list view so we cannot use its properties to update. To solve this, we create new individual @State properties to represent the bucketList properties that we want to update, namely name and completedDate and we can give them both the same default initial values as we do in our model.
Create @State properties for the two properties besides name.
xxxxxxxxxx@State private var note = ""@State private var completedDate = Date.distantPastonAppear block
When our view appears we can execute an onAppear block of code and after it appears.
The injected bucketItem is known, so we can assign to the two @State properties we just created the values corresponding to our bucketList item.
xxxxxxxxxx.onAppear { note = bucketItem.note completedDate = bucketItem.completedDate}Form
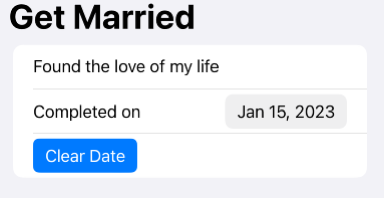
We can use a Form to to display the properties for updating.
Replace the
TextViewwith aFormblock .Create a
TextField.Use the string "Bucket note" as the title and bind text to the
$note@Stateproperty.Add a vertical axis to the TextField so that it will expand vertically as more text is entered.
For the
completedDateentry, we want to show an existing date only if the date has been completed so that means if it is not equal to that very old date ofDate.distantPast.If it is not equal to that date, we can create a
DatePicker.For the title we can use "Completed on:"
The selection will be bound to our
$completeDate@Stateproperty.We also want to only display the date and not the time as you see the default, so we can specify
displayedComponentsof.date.
xxxxxxxxxxForm { TextField("Bucket note", text: $note, axis: .vertical) if completedDate != Date.distantPast { DatePicker("Completed on:", selection: $completedDate, displayedComponents: .date) }}If you change the sample bucketItem array index in the sample to see changes in the preview provider you will see the date show up only when you have specified a date other than Date.distantPast
When there is not date, we want to set one, so create a button.
Set the label to "Add Date".
For the action, set the completedDate to the currentDate.
This will allow the users to change it if they like, but the default will be the current day.
xxxxxxxxxxButton("Add Date") { completedDate = Date()}ternary conditional operator
We can make this button double purposed by using a ternary operator. This is a shortened case of an if...then...else clause and is often referred to as WTF What ? True : False.
You state the comparison that is either true or false as the W, then follow that with a ? And present the True case then a : followed by the False case.
Change the button label to display "Add Date" if comparing the completedDate to DateDistantPast is true, or "ClearDate" if not.
Use an If, else clause in the action to compare the two dates but in the case that the
completedDateis equal to thedistantPastthen we can set thecompletedDateto today'sDate(), else, we will reset it back to theDate.distantPast.We can also apply a
.buttonStyleof.borderedProminent.xxxxxxxxxxButton(completedDate == Date.distantPast ? "Add Date" : "Clear Date") {if completedDate == Date.distantPast {completedDate = Date()} else {completedDate = Date.distantPast}}.buttonStyle(.borderedProminent)
Saving Updates
Making these changes does not update our original item though we still need to create an Update button.
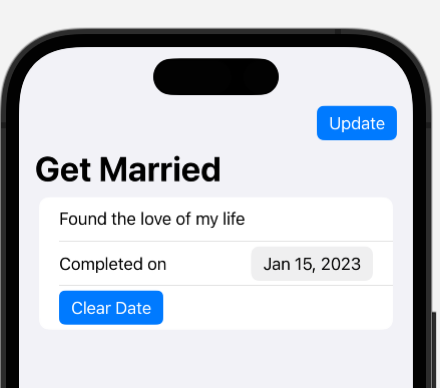
.toolbar and ToolbarItem
The navigation bar has a toolbar that we can add ToolbarItems to.
After the
.onAppearblock add a.toolBar.Inside there, create a ToolbarItem and accept the default override. SwiftUI is smart enough to know that you want create the item on the navigationBar and that you will want it on the trailing edge. (It is possible to change the toolbar location as well as the location of the item).
Create a button using the label "Update" and leave the action empty for now.
Add a
buttonStyleof.borderedProminent.
xxxxxxxxxx.toolbar { ToolbarItem { Button("Update") { } }}dismiss @Environment variable
SwiftUI is smart enough to know a lot about what you are doing and it stores that information in what is known as the Environment. One of the things it knows is whether or not you have pushed a view on to the NavigationStack. This is stored in an environment variable with a KeyPath of \.dismiss .
We can access that value using an
@Environmentproperty wrapper that we can assign to a variable of the same name.
xxxxxxxxxx@Environment(\.dimiss) var dismissOnce we update our
bucketItemwe want to go back to the main list so in our action, (after we have coded the updates (we still need to code the update part) we can have thedismissenvironment property run as an action.xxxxxxxxxxButton("Update") {dismiss()}
For more on
@Environmentvariables and values, see these videos:Environment Variables in SwiftUI https://youtu.be/DyaU04R9kBA
Custom Environment Values in SwiftUI https://youtu.be/rl7xj5usTzk
Updating
To update we need to know the complete array so we can update a single one.
This means we will need to pass it in (inject) from the BucketListView so we have access to it. We are already expecting the bucketItem as a constant, unchanging value.
This will be received but we need to be able to modify it and since we are not creating this item we cannot use
@State, instead we use@Binding.
xxxxxxxxxx@Binding var bucketList: [BucketItem]The preview will complain because it is missing that argument. We fix this the same way that we fixed our bucketItem. We create a static property to represent the binding of an array of BucketItem
Binding<[BucketItem]>.To this, we need to assign our array of sample items, but since in the preview, this will not be changing, we can assign it as a constant
BucketItem.sample.xxxxxxxxxxstatic let bucketList: Binding<[BucketItem]> = .constant(BucketItem.samples)Then in the detail view, we can add the required argument for the parameter.
xxxxxxxxxxstruct DetailView_Previews: PreviewProvider { static let bucketItem = BucketItem.samples[1] static let bucketList: Binding<[BucketItem]> = .constant(BucketItem.samples) static var previews: some View { NavigationStack { DetailView(bucketItem: bucketItem, bucketList: bucketList) } }}Note: you will often see developers take a shortcut here by creating the static items with the DetailView itself so the PreviewProvider could have been written like this.
xxxxxxxxxxstruct DetailView_Previews: PreviewProvider {static var previews: some View {NavigationStack {DetailView(bucketItem: BucketItem.samples[2],bucketList: .constant(BucketItem.samples))}}}
We can return to the action now and figure out which one of our items in the bound bucketList needs to be updated.
We can determine the index of that by using a
findFirstIndexmethod on a collection like an array that compares the iterator$0's id with thebucketItem.id.Unfortunately, there may be no match so what gets returned might be nil so we need to make that comparison.
If it is not nil, we can update the
noteandcompletedDateproperties at that index.Note: using
!On the index will perform what is known as aforce unwrapof anoptionalproperty (one that can possibly be nil) and guarantees that it exists. We know it does because we are within an if block that assures that for us so it is safe here to force unwrap
xxxxxxxxxxButton("Update") {let index = bucketList.firstIndex(where: {$0.id == bucketItem.id})if index != nil {bucketList[index!].note = notebucketList[index!].completedDate = completedDate}dismiss()}The
let index = ...and then checking to seeif index != nilcan be shortened into a single line usingif let index =...1When we do that, this is doing the check for us and is unwrapping the optional value so there is no need to use!to unwrap our index and the above code can be shortened to this.xxxxxxxxxxif let index = bucketList.firstIndex(where: {$0.id == bucketItem.id}) {bucketList[index].note = notebucketList[index].completedDate = completedDate}
BucketListView
NavigationDestination
We need to return to the BucketListView now and update destination.
Replace the Text View and the font modifier with a
DetailView.For the bucketItem, we can pass in the
itemthat we received from ourNavigationLink.The bucketList requires a binding to an array of BucketItem and we have that so we can specify it as a binding by prefacing it with a
$.
xxxxxxxxxx.navigationDestination(for: BucketItem.self) { item inDetailView(bucketItem: item, bucketList: $bucketList)}
Conditionally color if the item has been completed
I want to do one more thing, using a ternary operator again (W ? T : F) and apply a modifier to the TextField to change the .foregroundColor if the item's completed date is not distantPast to .red. If it is still distant past, we use the default .primary color.
xxxxxxxxxx.foregroundColor(item.completedDate == .distantPast ? .primary : .red)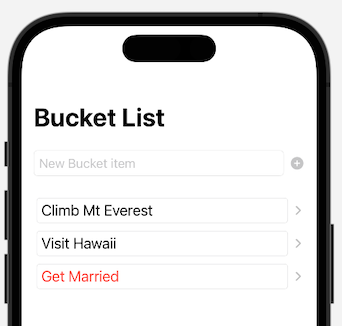
Part 2 completed Code
BucketListView
xxxxxxxxxxstruct BucketListView: View { @State private var bucketList = BucketItem.samples @State private var newItem = "" var body: some View { NavigationStack { VStack { HStack { TextField("New Bucket Item", text: $newItem) .textFieldStyle(.roundedBorder) Button { let newBucketItem = BucketItem(name: newItem) bucketList.append(newBucketItem) newItem = "" } label: { Image(systemName: "plus.circle.fill") } .disabled(newItem.isEmpty) } .padding() List { ForEach($bucketList) { $item in NavigationLink(value: item) { TextField(item.name, text: $item.name, axis: .vertical) .textFieldStyle(.roundedBorder) .font(.title3) .foregroundColor(item.completedDate == .distantPast ? .primary : .red) } .listRowSeparator(.hidden) } .onDelete { indexSet in bucketList.remove(atOffsets: indexSet) } } .listStyle(.plain) } .navigationTitle("Bucket List") .navigationDestination(for: BucketItem.self) { item in DetailView(bucketItem: item, bucketList: $bucketList) } } }}DetailView
xxxxxxxxxxstruct DetailView: View {    @Environment(\.dismiss) var dismiss    let bucketItem: BucketItem    @Binding var bucketList: [BucketItem]    @State private var note = ""    @State private var completedDate = Date.distantPast    var body: some View {        Form {            TextField("Bucket note", text: $note, axis: .vertical)            if completedDate != Date.distantPast {                DatePicker("Completed on", selection: $completedDate, displayedComponents: .date)            }            Button(completedDate == Date.distantPast ? "Add Date" : "Clear Date") {                if completedDate == Date.distantPast {                    completedDate = Date()                } else {                    completedDate = Date.distantPast                }            }            .buttonStyle(.borderedProminent)        }            .navigationTitle(bucketItem.name)            .onAppear {                note = bucketItem.note                completedDate = bucketItem.completedDate            }            .toolbar {                ToolbarItem {                    Button("Update") {                        if let index = bucketList.firstIndex(where: {$0.id == bucketItem.id}) {                          bucketList[index].note = note                          bucketList[index].completedDate = completedDate                        }                        dismiss()                    }                    .buttonStyle(.borderedProminent)                }            }    }}
struct DetailView_Previews: PreviewProvider {    static let bucketItem = BucketItem.samples[2]    static let bucketList: Binding<[BucketItem]> = .constant(BucketItem.samples)    static var previews: some View {        NavigationStack {            DetailView(bucketItem: bucketItem, bucketList: bucketList)        }    }}
BucketItem
xxxxxxxxxxstruct BucketItem: Identifiable, Hashable { var id = UUID() var name: String var note = "" var completedDate = Date.distantPast static var samples: [BucketItem] { [ BucketItem(name: "Climb Mt Everest"), BucketItem(name: "Visit Hawaii", note: "Go to Maui and Oahu"), BucketItem(name: "Get Married", note: "Found the love of my life", completedDate: Date()) ] }}