Coding Workshop 7 - Bucket List App Part 3

We have our app functioning now and we can add, update and delete our bucket list items, but when we stop and start the application again, we are back to the same sample array.
What we want to accomplish now is to save our list somewhere so that when we start up again, it can reload and display them. This is called Data Persistence. In the iOS world, you can store your data into databases like SQLLite that are managed by Core Data or some other database system like Realm, However, if your needs are light, then you can store your data in a file in a structure format that you can load and populate your models from.
Before we do that though, we are going to move some properties and functionality of our views into a separate class that in the future can be used in other view should I choose to add to this application
DataStore Class
We can create a class and inject it into the environments that it can be observed by any view that chooses to access the class, its properties and functions.
Create a new file and call it DataStore.
Inside the file, create a new
classwith the same name but since the views will need to observe changes on the properties, we must make sure that the class conforms to theObservableObjectprotocol.It is here where we will be maintaining our array of
BucketItemand be able to update, delete etc from the array so we can create a variable calledbucketListas we did in ourBucketListView, but instead of it being a@Stateproperty, we make it@Publishedand initialize it as an empty array,When this class gets initialized, we will want to load the stored items and assign them to our
bucketListproperty. Whenever a new instance of a class gets created an initializer function is run. There is no requirement to create an initializer for a class of all of the properties have values like ours does, but we can create one and then perform an action within the body of the initializer function.In our case we want to call a
loadItems()function which we will create next.Create a function called
loadItemsand in the body, for now, simply assign tobucketList, the staticBucketList.samplesarray.
xxxxxxxxxxclass DataStore: ObservableObject { @Published var bucketList:[BucketItem] = [] init() { loadItems() } func loadItems() { bucketList = BucketItem.samples }}
EnvironmentObject and Bucket_ListApp
Now that we have that class created, when our application gets initialized (in the file that is decorated with the @Main property wrapper), we can create an instance of this new class.
In Bucket_ListApp create an instance of the
DataStoreclass as a@StateObjectproperty. Think of@StateObjectas being equivalent for a class object to what@Stateis to a view property.In the
WindowGroup, where we presentBucketListView(we can use the.environmentObjectmethod to inject that object into the environment so all views that want to can refer to it.
xxxxxxxxxx@mainstruct Bucket_ListApp: App { @StateObject var dataStore = DataStore() var body: some Scene { WindowGroup { BucketListView() .environmentObject(dataStore) } }}Update Views
BucketListView
BucketListView is one of those views that we want to access that environmentObject
Replace
bucketListstate property with anEnvironmentObject. Remember that it has already been initialized and the sample items have been loaded, so in our dataStore, ourbucketListis access viadataStore.bucketList. When you create anEnvironmentObjectin a view struct and specify the type, which in our case isDataStoreit checks to see if there is an instance of that type of object in the environment and assigns it to the variable that you specify. If it can't find it, your app will crash.
xxxxxxxxxx@EnvironmentObject var dataStore: DataStoreThe preview will complain because it cannot present our list unless it too has access to the environmentFix the preview so we can fix that by injecting a new instance right here.
xxxxxxxxxxstruct BucketListView_Previews: PreviewProvider {static var previews: some View {BucketListView().environmentObject(DataStore())}}There are 4 other errors being displayed. Fix first 3 error references to
bucketListand$bucketListto now bedataStore.bucketListor$dataStore.bucketListRemove the
bucketListargument in theDetailViewfor thenavigationDestinationbecause we will access it from the environment. (You will still see an error here, but that is because ourDetailViewis still expecting us to inject thebucketListfrom here.)xxxxxxxxxx.navigationDestination(for: BucketItem.self) { item inDetailView(bucketItem: item)}
DetailView
Open Detail view.
Remove the
@Bindingvariable forbucketList.Add
EnvironmentObjectfor ourdataStorejust like we did in theBucketListView.xxxxxxxxxx@EnvironmentObject var dataStore: DataStoreRemove as well from the preview, the
bucketListargument, and add in theenvironmentObjectmodifier.xxxxxxxxxxstruct DetailView_Previews: PreviewProvider {static let bucketItem = BucketItem.samples[1]static var previews: some View {NavigationStack {DetailView(bucketItem: bucketItem).environmentObject(DataStore())}}}Cut out the action in the update button (except for the dismiss().
replace it with a yet to be designed function in our
DataStorecalledupdate().This function will have 3 arguments,
bucketItem, aBucketItemtype,note, aStringandcompletionDateaDateso we will be passing in to that function the corresponding values from our view. ThebucketItemthat was passed in, and our newnoteandcompletedDatevalues.
xxxxxxxxxx.toolbar { ToolbarItem { Button("Update") { dataStore.update(bucketItem: bucketItem, note: note, completedDate: completedDate) dismiss() } .buttonStyle(.borderedProminent) }}DataStore
Update function
Return now to the
DataStoreclass and create a function in DataStore calledupdatewith the 3 parameters we created as the arguments in our call above;bucketItem, aBucketItemtype,note, aStringandcompletionDateaDate.Paste in the cut code that use to be in the button action.
xxxxxxxxxxfunc update(bucketItem: BucketItem, note: String, completedDate: Date) {    if let index = bucketList.firstIndex(where: {$0.id == bucketItem.id}) {                                  bucketList[index].note = note                                  bucketList[index].completedDate = completedDate                                }
}
Loading and storing data in DataStore
Now we can create our save and load function to save and restore our data when the app launches.
Storing information in an iOS app can be done by storing in a database like SQLite with a CoreData wrapper, or in a Realm database using Realm, or even online using CloudKit or Firebase.
However, for simple data structures like this without many demands or records, you can save your list as structured data in a file.
First we need to have a place to store the data, and a name for the file.
The best and most secure place to store this is in the application's own, protected Documents Directory Your users cannot access that file directly on their phone. Only our application can through code.
The documents directory can be accessed through the static URL property URL.documentsDirectory.
To that url, we can append a path.
Create a
fileURLproperty for the storage location and name of the file to append will bebucketList.json.xxxxxxxxxxlet fileURL = URL.documentsDirectory.appending(path: "bucketList.json")
JSON
The most common format for encoding and storing data is a format called JSON. It is beyond the scope of this tutorial to go though it in a lot of detail but the process for encoding and decoding (restoring) data to and from JSON is quite easy. To enable this, we must first make sure that our object type BucketItem conforms to the Codable protocol.
Conform BucketList model to the Codable protocol
xxxxxxxxxxstruct BucketItem: Identifiable, Hashable, Codable {Now we can create a function and call it
saveList()Inside this function we are going to try to encode and write the encoded data to our file. This may fail if something goes wrong (it shouldn't if we code it properly) so we need to enclose our attempt in a
do..catchblock.Within the do block we can create a constant property called
bucketListsDatathat wetryto encode using theJSONEncoderClass'sencodemethod and pass to it our entire array which isbucketList.Once it has been encoded, we can covert it to a
Stringusing the StringdecodingourbucketListDataasUTF8.self.Now that we have it as a string, we can take that string and call the strings's
writemethod to write it to thefileURL, settingatomicallytotrueusing .utf8encoding.Should any of that fail we might as well give up so we catch the error and execute a fatalError indicating that we could not encode and save our list.
xxxxxxxxxxfunc saveList() {do {let bucketListData = try JSONEncoder().encode(bucketList)let bucketListString = String(decoding: bucketListData, as: UTF8.self)try bucketListString.write(to: fileURL, atomically: true, encoding: .utf8)} catch {fatalError("Could not encode bucketlist and save it")}}See my series on JSON: https://youtube.com/playlist?list=PLBn01m5Vbs4DKrm1gwIr_a-0B7yvlTZP6
Update Code
Now that we have our save function, every time you make changes to an item (add, update and delete) we can call this function.
BucketListView
In
BucketListViewwe need to do that in our button action.
xxxxxxxxxxButton { let newBucketItem = BucketItem(name: newItem dataStore.bucketList.append(newBucketItem) newItem = "" dataStore.saveList()} label: { Image(systemName: "plus.circle.fill")}We also need to do this when we delete.
xxxxxxxxxx.onDelete { indexSet in dataStore.bucketList.remove(atOffsets: indexSet) dataStore.saveList()}Similarly, when we change a bucketList name value in the list view, we need to save the list once more. We can do this with an
onChangemethod on the ForEach loop that watches for changes on the bounditem. When it notices a change, we can call thesaveListfunction once more.This can be called before the listRowSeparator modifier. Notice the use of the _ in place of creating a variable for the new value. Since we never use it, we can simply use an _
xxxxxxxxxx.onChange(of: item) { _ in dataStore.saveList()}
DetailView
We could call the function in the UpdateButton action after it calls the dataStore's update function, but why not add it to the update function itself in DataStore.
xxxxxxxxxxfunc update(bucketItem: BucketItem, note: String, completedDate: Date) { if let index = bucketList.firstIndex(where: {$0.id == bucketItem.id}) { bucketList[index].note = note bucketList[index].completedDate = completedDate saveList() }}Refactoring Code
Rethinking this, we may wish to add the creation of new items and the deletion of items to other views in the future, so why don't we refactor the update and delete code that is currently in our BucketListView and move the actions in to the DataStore.
Create Function
Cut out the first two lines of the action in the add button in BucketListView and replace it with a yet to be created function in our dataStore called
createwhich will have one parameter which will be anewItem, aString. Delete thesaveListfunction here too as we will add that to our new function in theDataStoreclass. You should be left with only two lines in your action now.xxxxxxxxxxdataStore.create(newItem)newItem = ""In
DataStorecreate the functionBy placing an _ in front of the parameter name will mean that the call site does not have to provide it. So instead of dataStore.created(newItem: "some value") it can be dataStore.create("some value")
xxxxxxxxxxfunc create(_ newItem: String) {}Paste in and edit code that was cut out by removing any references to
dataStoresince we are already in theDataStoreclass and make sure you add in thesaveList()function.xxxxxxxxxxfunc create(_ newItem: String) {let newBucketItem = BucketItem(name: newItem)bucketList.append(newBucketItem)saveList()}
Delete Function
In BucketListView, delete both lines in the
.onDeleteaction and replace it with a call to adeletefunction that we will create in ourDataStoreclass. This will have one argument which will be anindexSetwhich is a typeIndexSetand we can pass in the indexSet that we get when we swipe.Note this time I will not be using an _ in front of my function parameter
xxxxxxxxxxdataStore.delete(indexSet: indexSet)In the
DataStoreclass, create a new function calleddeleteand provide theindexSetparameterPaste in the code cut from the delete function in
BucketListViewRemove both references to the
dataStore.xxxxxxxxxxfunc delete(indexSet: IndexSet) {bucketList.remove(atOffsets: indexSet)saveList()}
Documents Directory
To determine and find the saved document, add a line to an onAppear function in our app entry file that will print out the path to that directory to the console when the app loads.
xxxxxxxxxx@mainstruct Bucket_ListApp: App { @StateObject var dataStore = DataStore() var body: some Scene { WindowGroup { BucketListView() .environmentObject(dataStore) .onAppear { print(URL.documentsDirectory.path) } } }}Test
You can test out the app now by running in the simulator.
Run the app and add, update and delete a few bucket list items and make sure you perform updates to force the saveList function to be called.
In the console you will find the path to the Documents directory. It will look something like this:
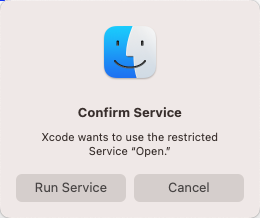
xxxxxxxxxx/Users/slynch/Library/Developer/CoreSimulator/Devices/EB3A7E85-7F8F-4BA6-A2D1-09E3EDAD157F/data/Containers/Data/Application/804A8851-8994-420B-BB1B-767E2FFE3EDF/DocumentsSelect the text, the right click and choose Services -> Open and when the dialog appears, click on Run Service.
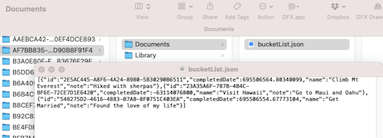
This reveals the document in the documents directory and it will be called bucketList.json.
Right click on this file and open it with the TextEdit app and you will see the JSON string.
Copy the string and open a web browser and go to . https://jsonformatter.org
Paste the copied text into the left pane and then click on Format/Beautify and you will get a better representation of the JSON object.
You may notice that it is an
arrayof objects just like our array ofBucketListitems and each item consists ofKey-Valuepairs with each key representing the property name of ourBucketItemstruct and the values correspond to the values of our array objects. This is the beauty of JSON Codable.
Run again and we are back to the original, we still need a Load Json function. This means we still have to load that saved file when we launch our app.
Loading JSON
Currently our loadItems function is loading our sample data. What we need to do is check to see if a file called bucketList.json already exists and decode it and populate our empty array that we start with.
First check to see if the file exists at that path using the the
FileManager().fileExistsmethod at the path specified byfileURL.path.xxxxxxxxxxfunc loadItems() {if FileManager().fileExists(atPath: fileURL.path) {}}If it does, we try to get data from the contents of that fileURL.
This might fail, so like the saveList function, we create a
do...catchblock.In the do block we can let data be the result when we
tryto get the data from the contents of thatfileURL.If it does not fail, we can assign to our
bucketListpublished property the result when withtryto use theJSONDecoder()'sdecode(method for the array ofBucketItemtype from thatdata.If either of these two tries failed, we can simply call the saveList() function which will create a new file at the url with our empty array and thus overwrite any corrupted file that may be there.
xxxxxxxxxxfunc loadItems() { if FileManager().fileExists(atPath: fileURL.path) { do { let data = try Data(contentsOf: fileURL) bucketList = try JSONDecoder().decode([BucketItem].self, from: data) } catch { // The file is corrupt so currently the bucketList is empty so store it and replace the damaged file saveList() } }}Run once more now and your updated items are loaded,
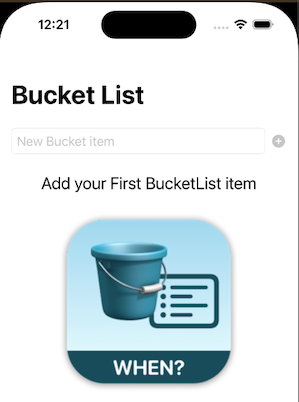
AppIcon and empty list
Delete all items in the list and see that the start view (contentView is pretty boring).
We can spruce this up quite a bit now by adding some assets.
Adding Image Assets
Right now, our app has no icon, and our totals view does not have the image we saw in the preview image.
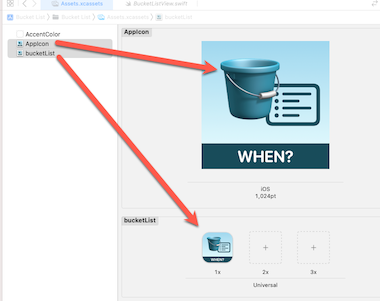
You should have two assets available to you.
appstore1024.png
This is an image that is 1024 X 1024 and I want to use it as the App Icon
Open the assets folder in Xcode
Select the AppIcon item and drag and drop the image on to the placeholder in the center
bucketList
This is a a smaller version with rounded corners and is 256 X 256
Drag and drop it into the asset folder
Update BucketListView
Enclose the List and the .listStyle modifier in an
if -elseclause that check to see if the dataSore. bucketList is not empty.If it isn't we present our list.
If it is, we can create a new
Textview, presenting theString"Add your First BucketList item".Follow this with a
Imageusing the asset "bucketList".Add a Spacer() to push it all up to the top of the screen.
xxxxxxxxxxif !dataStore.bucketList.isEmpty {List {...}.listStyle(.plain)} else {Text("Add your First BucketList item").font(.title2)Image("bucketList")Spacer()}