Coding Workshop 8 - Location Finder App Part 1
We are going to build a Location Finder application where you can select a country and enter a postal or zip code to find the location in that country based on that postal code and plot it on a map.
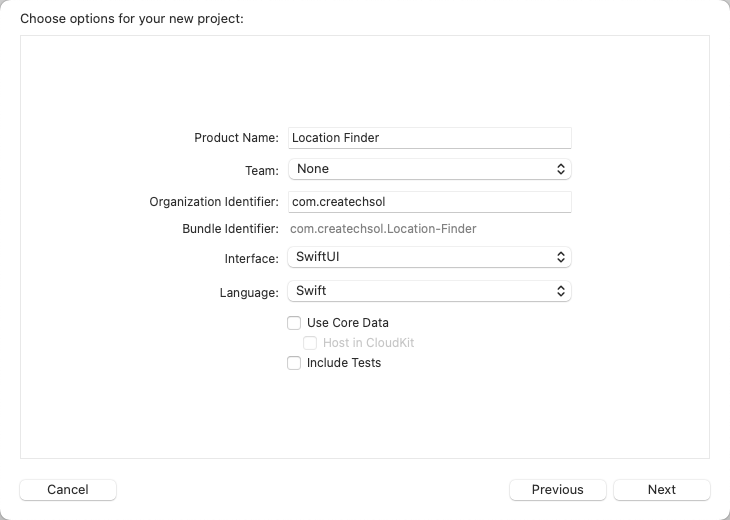
Let's start building this app by creating a new iOS App and name it Location Finder.
Rename ContentView
As we did in the previous example, rename ContentView to better reflect what the view represents. Our application is actually only going to have this single view.
Rename
ContentViewas LocationFinderView.xxxxxxxxxxstruct LocationFinderView: View {Update the name of the PreviewProvider struct to reflect this change as well.
xxxxxxxxxxstruct LocatopmFinderView_Previews: PreviewProvider {
Exploring the Zippopotam API
An API stands for Application Programming Interface. It is a set of tools and protocols which allow two different software programs to communicate with each other. In simple terms, it is a way for different software components to talk to each other and share data.
An example of an API is the Mastodon API. It allows developers to access Mastodon data, such as posts or toots, profiles, and trends, and to use it in their own applications. They can use the API to create apps that show a user's posts, or to search for posts related to certain topics.
Many APIs require that you have an API key to access the data. This means that your access key can be revoked as it was recently for some Twitter client applications which then prevented the applications from working at all.
It is more common now to find that if you want to build an application to present information from a source on the Internet, that source provides and API. This includes APIs for weather, stock market and literally anything you can think of. Some are free and some have limitations as to how often you can make calls to retrieve data from them.
If you want to get your hands dirty and craft your own applications, I suggest you visit the apipheny website that has a list of 90 of the top APIs in different categories. Some required keys, but they list 15 that do not, and we are going to be using one of them.
The Zippopotam project is for finding locations based on Postal Codes or Zip Codes. It is a free API and the response you get is in the form of JSON, which we saw in the previous tutorial. There are over 60 countries supported and it is an open source project.
Using the API
Using the API is simple and you can test in the browser you form a URL as follows:
- Start with the base URL -
https://api.zippopotam.us. - Add a path that will represent the country code for which you are searching - ex
/CAfor Canada. - Add a path that will represent the full or part of the Postal or Zip code in the range that the country supports as shown in their chart. Example
/V5M. - The final URL then is something like
https://api.zippopotam.us/CA/V5M.
If I enter this into a Web browser and go to that URL, you get a JSON Response.
xxxxxxxxxx{ "post code": "V5M", "country": "Canada", "country abbreviation": "CA", "places": [ { "place name": "Vancouver (South Hastings-Sunrise / North Renfrew- Collingwood)", "longitude": "-123.0556", "state": "British Columbia", "state abbreviation": "BC", "latitude": "49.2695" } ]}Creating the Model
If you recall from the previous application, JSON is made up of key - value pairs where the keys will represent the names of our properties that we will define for our model, and the values will be the values used in a particular instance of that object.
So let's start there by creating a model that can reflect this response, It is a little more tricky than the previous one in that it appears we have 4 properties, but one of them is an array of other objects.
Copy the
JSONto your clipboard so that you have it available.In Xcode create a new Swift
fileand call itLocationPaste in the copied code then select it and surround the code with
/*at the top and*/at the bottom. This will create the entire block as a comment.xxxxxxxxxx/*{"post code": "V5M","country": "Canada","country abbreviation": "CA","places": [{"place name": "Vancouver (South Hastings-Sunrise / North Renfrew- Collingwood)","longitude": "-123.0556","state": "British Columbia","state abbreviation": "BC","latitude": "49.2695"}]}*/Create a new
structand name it Location and make sure that it conforms to theCodableprotocol.xxxxxxxxxxstruct Location: Codable {}What we want to do is pick out the keys that we want to use in our application and create properties in our Location struct.
There is no need for us to use the returned postal code as we will be typing it in so we know what it is.
There is no rule that states that you have to use every key value pair that an API has to offer
We will be able to use
countrythough, so we can specify that as a String property.Similarly, we will not need the
country abbreviationas we will have that already when we make our submission.The next property an array of objects so we need to create another struct that will represent that array of objects so we can create an embedded struct called
Placefor that object.
xxxxxxxxxxstruct Location: Codable {var country: Stringstruct Place: Codable {}}This struct has key value pairs that I am going to use in my application.
There is a problem with
place namehowever as property names in a Swift struct must not contain spaces. So, let's replace that by usingcamelCaseand name the propertyplaceNameand it will be of typeString.I will also need the other remaining properties except for
state abbreviationand all areString.Now that we have that struct inside our
Locationstruct, we can use it and create aplacesproperty in ourLocationstruct that is an array of thosePlaceobjects.xxxxxxxxxxstruct Location: Codable {var country: Stringstruct Place: Codable {var placeName: Stringvar longitude: Stringvar state: Stringvar latitude: String}var places: [Place]}We still need to resolve the issue of our renaming that
place nametoplaceNameand we do that by creating aCodingKeyenuminside thePlacestruct that conforms to both theStringandCodingKeyprotocols.Here you need to create a case that represents all of your properties and only assign a String value for those properties that have been changed, ie
placeName = "place name".xxxxxxxxxxstruct Location: Codable {var country: Stringstruct Place: Codable {var placeName: Stringvar longitude: Stringvar state: Stringvar latitude: Stringenum CodingKeys: String, CodingKey {case placeName = "place name"case longitudecase statecase latitude}}var places: [Place]}
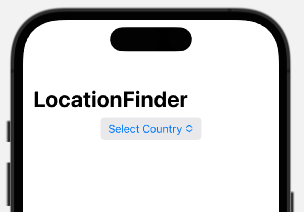
LocationFinderView
We can now start to design our user interface in LocationFinderView.
Remove the
Imageview and its modifiers from theVStack.Remove the .padding.
Embed the VStack in a
NavigationStack.Add a
.navigationTitleto the VStack and provide the string "Location Finder".xxxxxxxxxxstruct LocationFinderView: View {var body: some View {NavigationStack {VStack {Text("Hello, world!")}.navigationTitle("LocationFinder")}}}
Countries JSON
As the first item in the VStack we want to create a Picker that will list all of the countries available.
I am going to make this easy for you and provide you with another JSON file that is structured in such a way that we can build an array of objects that have two properties; the country's name, code and range. These are 3 of the columns for the list provide on the web site.

What I did to create this JSON file that I call countries.json was to copy the table to my clipboard and pasted it into a Numbers document.
I then removed the columns that I did not want and saved it as a CSV file.
Next, I used a web site called https://www.convertcsv.com/csv-to-json.htm and used it to convert the vile to JSON.
This file is available in the downloadable LocationFinder Assets folder.
- Drag the countries.json file from the download Assets folder and drop it right in the navigation pane of your application. Anything store in this location is accessible to your app and it is known as the app's Bundle.

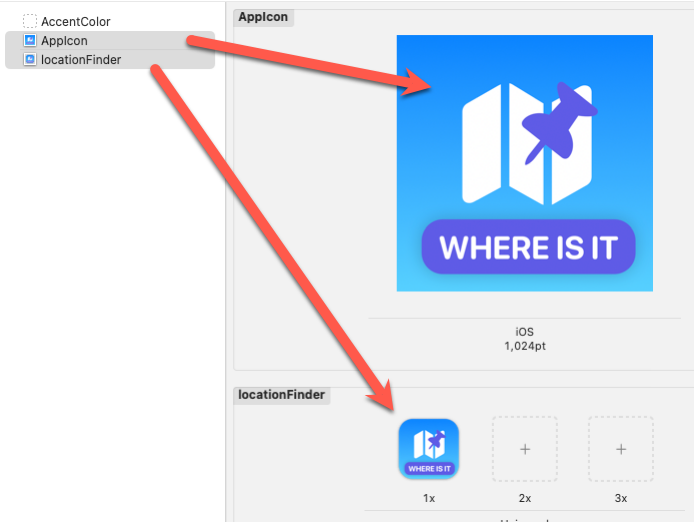
App Icon and Image Asset
While we are here, open the Xcode assets folder and notice that right now, our app has no icon, and we will also need the image for our main screen when our app loads and before we choose a country.
You should have two assets available to you.
appstore1024.png
This is an image that is 1024 X 1024 and I want to use it as the App Icon.
- Open the assets folder in Xcode.
- Select the
AppIconitem and drag and drop the image on to theplaceholderin the center.
locationFinder.png
This is a a smaller version with rounded corners and is 256 X 256.
Country Model
Well, now that we have our JSON, we will need to create a Model into which we can populate our array of countries.
The model will correspond to the JSON in the countries.json file.
xxxxxxxxxx{ "name": "Andorra", "code": "AD", "range": "AD100 : AD700" }This is fairly straightforward. Our model will have to have 3 properties; name, code and range and all are String types.
Create a new Swift file and call it Country.
Inside this file, create a new
structwith the same name but make sure that it conforms to both theCodableandHashableprotocols.Codable conformance is so that we can load from the JSON file and Hashable because we want to use it in a Picker selection.
Create the 3 properties as discussed above.
xxxxxxxxxxstruct Country: Codable, Hashable {let name: Stringlet code: Stringlet range: String}This will allow us to decode our JSON and populate an
arrayofCountry-[Country].
There is one more instance that I want I my array however, and that is a static Country instance called none that we can use as the first element of the array so that when we present our picker, the selection will say "Select Country" and the country code will be "XX".
Inside the Country struct create this static instance.
xxxxxxxxxxstatic var none: Country {Country(name: "Select Country", code: "XX", range: "")}Since the property is a static one for the struct
Country, we can reference it asCountry.none.
LocationService
In the last tutorial we created a DataStore class that we used to manage our data and functions related to that data. In this tutorial we are going to create a similar class but this time we are going to call it LocationService.
Create a new Swift file and name it LocationService.
Inside that class, create a new
classusing the same name and make sure the it conforms to theObservableObjectprotocol so that we can createPublishedproperties that can be observed by other views and update the state and UI of our application.Create a
@Publishedproperty forcountriesthat is an array ofCountryand initialize as an empty array.xxxxxxxxxxclass LocationService: ObservableObject {@Published var countries: [Country] = []}
Loading the countries.json
Inside the class, create a new function called
loadCountries()and it is in here that we will load and decode the json file and assign the decoded array to our published properties.xxxxxxxxxxfunc loadCountries() {}We must first ensure that the file exists in our application
Bundleand if not, we cannot proceed so we use aguardcheck to unwrap the url or produce afatalError.xxxxxxxxxxguard let url = Bundle.main.url(forResource: "Countries", withExtension: "json") else {fatalError("Failed to locate Countries.json in bundle.")}Now that we have ensured that the file exists, we can try to get the data from the contents of that url. If it fails again, there is no point in proceeding so we use another
guardcheck to unwrap thedataand produce afatalError.xxxxxxxxxxguard let data = try? Data(contentsOf: url) else {fatalError("Failed to load Countries.json from bundle.")}Next, we can use a
JSONDecoderclass'sdecodemethod to try and decode from that data our array ofCountry, This may fail, so we will enclose the try in ado...catchblock and if it does fail, again, no point in proceeding, so we will catch the error and produce afatalError.If the decoding try is successful, we can assign it to our
@Publishedcountriesproperty as it will be our array.Then, we can insert our static Country.none at the beginning our the array using an array
insertmethod to position it at the beginning of the array; at index 0.xxxxxxxxxxdo {countries = try JSONDecoder().decode([Country].self, from: data)countries.insert(Country.none, at: 0)} catch {fatalError("Failed to decode Countries.json from bundle.")}
Initializer
With our loadCountries function complete, and our countries array populated by that function, we can initiate a call to this function when our class is instantiated.
xxxxxxxxxxinit() { loadCountries()}LocationFinderView
In the previous tutorial, we inject our ObservableObject class into the environment at the app entry point because we wanted to use the data in multiple SwiftUI views. We will only have a single SwiftUI view in this app, so we do not need to do that here.
- We can create our instance of the
LocationServiceclass right inside theLocationFinderViewstruct and we do this as a@StateObject
xxxxxxxxxx@StateObject var locationService = LocationService()LocationPicker
Since we are instantiating an instance of this class now, our LocationService class has been initialized and its countries property has been populated from the countries.json file.
We can use this array then to create a Picker.
- We will need a
@Stateproperty to bind our selection to so create one and provide the staticCountry.nonevalue as the initial value.
xxxxxxxxxx@State private var selectedCountry = Country.noneReplace the
Textview with aPickerview using the title key, selection, label constructor.- For the
titleKeyuse the string "Select Country" - For the
selection, bind it to$selectedCountry.
xxxxxxxxxxPicker("Select Country", selection: $selectedCountry) {}- For the
For the content (the trailing closure) we can use a
ForEachloop over ourlocationService.countriesarray. This needs to be an identifiable collection but we have not specified that ourCountryobject conforms to theIdentifiableprotocol and provided it with anidproperty. We can bypass that conformance so long as we can specify anidkeyPathfor one of the properties that will be unique, and in our case that will be thecodeproperty,This will provide us with an iterator variable that we can call
countrythat we can use in creating our picker selection views. We can use thecountry.nameas the string for aTextview, but since we are only displaying the country's name, we must provide atagfor that selection to indicate that we want to use the entirecountryto bind to ourselectedCountry.xxxxxxxxxxPicker("Select Country", selection: $selectedCountry) {ForEach(locationService.countries, id: \.code) { country inText(country.name).tag(country)}}Add a
.buttonStyleof.borderedto make the picker stand out more.Add a
Spacer()to push the picker up to the top of theVStack.xxxxxxxxxxNavigationStack {VStack {Picker("Select Country", selection: $selectedCountry) {ForEach(locationService.countries, id: \.code) { country inText(country.name).tag(country)}}.buttonStyle(.bordered)Spacer()}.navigationTitle("LocationFinder")}